
 Sign In
 Support


KiduJoJole's Blog
The allmenus cheat
This is an except from the discussion topic about the allmenus command. It has a link to the tutorial in The Sims 2 at SimsHost.
It works! And apparently it works with any version of the game. The
trick is to make sure that you edit the GlobalProps.xml file in the
folder that goes with the latest expansion pack that you have installed.
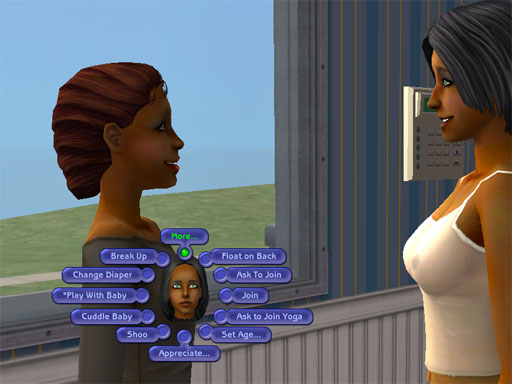
Andrea and Sophie try out the "allmenus on" command.
Click on the image for all ten of the screen shots showing all the menu options.
This would be useful when you want a specific animation for a screen
shot or perhaps if you want some special interaction between characters
that's not available, but mostly it's a pain in the neck to have to
click through all those menus.
Click on the image to see the web page I hastily cobbled together about
this. There are images showing all 10 pages of possible options for
things that Andrea can do to Sophie here.
Zodiacal Atraction
This is pilfered from a message that ZirconiaWolf posted in the thread
about "Necessary Hacks" in the Discussions and Help section:
All I can gather from the Prima guide is that attraction is based on
some (apparently very) complicated combinations of turn ons/offs,
personality traits, aspiration type & of corse (the Maxis interpitaion of) their zodiac signs.
This- obviously- would "count" for more than 3 Bolts (which isn't even
possible in the game) if the "counting method" made any sort of logical
sense, so Lord only knows quite how Maxis programed the "attraction factor" in the game! (I still swear some of it's random! )
Also- aside from the "zodiac"
signs- there is no real info (in the guide) as to exactly which trait
conflicts with which! Turn ons/offs is pretty strait forword but just how "lazy" does a Sim need to be to be rendered un-attractive to a more
"active" Sim (for example) isn't explained. (This is pretty wiered too,
as those of you who are familuar with Prima guides will be VERY
knowlegable about their almost cumpulsive use of
charts/graphs/mathamatical calculations/etc for darn near everything
else in the game! NOTE TO PRIMA: Yo guys, next time how about ditching
the discriptions of EVERY piece of furniture in the game & tossing
in an "Attraction Calculation Graph" or something???? )
Oh, just in case some of the folks out there don't have/want the Prima guide, here is how SIMS (1 & 2) determin the whole "ziodiac" attraction thing.........
| THIS SIGN | IS ATTRACTED TO | IS REPELLED BY |
| Aries | Gemini
Taurus |
Cancer Libra |
| Taurus | Aries Libra |
Virgo Cancer |
| Gemini | Pisces Virgo |
Aries Capricorn |
| Cancer | Taurus Scorpio |
Gemini
Aries |
| Leo | Sagittarius
Cancer |
Capricorn Gemini |
| Virgo | Aquarius Sagittarius |
Taurus Leo |
| Libra | Cancer
Virgo |
Pisces
Scorpio |
| Scorpio | Pisces Leo |
Libra Aquarius |
| Sagittarius | Capricorn
Pisces |
Scorpio
Libra |
| Capricorn | Aquarius Taurus |
Leo Gemini |
| Aquarius | Sagittarius
Capricorn |
Scorpio Virgo |
| Pisces | Gemini Scorpio |
Aries
Leo |
-ZW
----------
Edit: Added color indicators
Mutual Attraction
Mutual Repulsion
Repulsed by someone who is attracted to me
Attracted to someone who is repulsed by me
Other person is neither attracted to nor repulsed by me.
No more ugly Townies/Dormies!
I used to nuke my new hoods with deleteallcharacters then cleaning up
the stray crap in the neighborhood file with SimPE. However, I started a
new 'hood for experiments in growing up Dormies, and discovered it is
actually kind of nice to have a good supply of preexisting Townies and
Dormies to interact with, instead of waiting for them to slowly
generate.
To prevent ugly NPCs with stupid names from ever getting created:
1) Before starting your game:
a) Get Nailati's replacement face templates. She's only got three of them done, but they are wonderful!
http://www.moreawesomethanyou.com/smf/index.php/topic,3804.0/topicseen.html
b) Get Jordi's names hack.
http://www.modthesims2.com/showthread.php?t=207539
c) Prevent the ugly Townies: Open up Program Files\EA GAMES\The Sims 2\TSData\Res\UserData\Neighborhoods\N001. Zip up the Characters folder (just in case you ever need them), then open it and delete its contents.
d) Prevent the Pets families from appearing in the SimBin: Open up Program Files\EA GAMES\The Sims 2 Pets\TSData\Res\NeighborhoodTemplate. Zip up the P001 folder, then open it and delete its contents.
e) Depopulate the Pets populated lots: Open up Program Files\EA GAMES\The Sims 2 Pets\TSData\Res\UserData\LotCatalog. Zip together all files starting with cx_Character_, then delete them.
2) Create a new neighborhood.
3) When adding sub-hoods (Uni, Downtown, OFB), don't use the Maxis
subhoods; add a custom one and populate it with lots you packed up from
the Maxis subhoods in a dummy neighborhood.
Best looking bunch of Townies and Dormies I've ever had! Haven't checked out the Downtownies yet...
How To Create Custom Colleges for The Sims 2 University
Here's How:
- Click the College Chooser icon in the neighborhood screen (located in the top left corner).
- Click Create College icon.
- Click Create Custom College icon at the bottom of the template college list.
- Choose a terrain type. The terrains are in "SimCity 4" format, and show the ones you get when you create a new neighborhood. The game comes with a selection, but you can create your own in the same way you create them for regular neighborhoods.
- You will be prompted for a neighborhood name and description. When done click the Done button.
- The new college will be loaded. You can then add a neighborhood story, or add one later. Click the Done button.
- The college is now yours to customize. Under the Lots and Houses bin you will find Dorms under Speciality lots. You can create libraries, gyms, etc. by playing emplty lots and making them community lots.
- Houses from the bin can be used to make private residences. Your favorite neighborhood homes, can be placed in the college.
- Choose one Secret Society building from the Speciality Lots. The building will disappear as soon as it is placed. There are three lots to build. You can place other buildings over the spot the Secret Society was placed.
- Further customize your college with decorations, such as a rainbow, street lights, trees, boulders, etc.
Tips:
- You do not have to perfect the neighborhood in one sitting. You can continue to build and decorate long after students have started attending the college.
- To save time, you can package community lots (like the Campus Gym) to be used in your custom college. To package a lot, find the community lot you want, click the Package Lot icon. Close the game and find the packaged file (location is given when you package it). Double-click the file and it will be installed and ready to use the next time you start "The Sims 2 University."
What You Need:
- "The Sims 2"
- "The Sims 2 Univeristy"
- Neigborhood that needs a college
How To Share Your The Sims 2 Houses
Here's How:
- Start "The Sims 2."
- Open the neighborhood that has the home you want to share or upload to a website.
- Click on the house.
- Click on the info icon.
- Click on the icon on the top, looks like a star with an arrow.
- Choose whether you want to package the house and upload to exchange, or package so you can upload to a website.
- If you choose upload to a website, the house will be packaged and be found at: my documents\ea games\the sims 2\packagedlots\.
Tips:
- Once the house is in the packaged format (.sims2pack), gamers who download your house only have to double click the file to install it. The house will appear in the lots bin in the Neighborhood screen.
What You Need:
- "The Sims 2"
- House you want to share
How To Create Custom Eye Color in The Sims 2 Body Shop
Here's How:
- Start The Sims 2 Body Shop. Choose Create Parts at the top of the screen. After this click Start New Project. From the next menu, you have the choice of which part you are going to make. Select Create Genetics. Next choose Eye Color.
- In the eye color screen, you will see the colors already available to you. Pick one of the colors to modify. I choose brown.
- With the eye color selected (there will be a green line around choice), click the Export Selected button near the bottom of the screen.
- Enter a project name. Name this one, FirstTryEyeColor or the new color you are going to make. Click the Accept Project Name button.
- The next screen will show where the eye textures were saved. Open Windows Exploreer or My Documents, and browse to the folder.
- With the eye color folder open, you will see three bmp files and a package file. You need to open stdMatBaseTextureName.bmp with your favorite graphics program (Photoshop, Paint Shop Pro, etc.)
- Within your graphics program, use the hue/saturation adjustment to create the eye color you desire.
- Once you have a color you want, save the file. Switch back to The Sims 2 Body Shop. Click the Refresh Preview Sim. You may continue to save your work and refresh the preview Sim until you are satisfied.
- Next we need to create a swatch that will appear in The Sims 2 Body Shop. Open the swatch.bmp in your graphics program. You can create the swatch in a variety of ways. I copy the eye from the original, and paste it into the swatch. Save the file after you done.
- Refresh the Preview Sim. Once you are happy with the results, Click the Import to Game button.
- The eye color will be available to you when you create a new Sim.
What You Need:
- The Sims 2 Body Shop
- Graphics Software
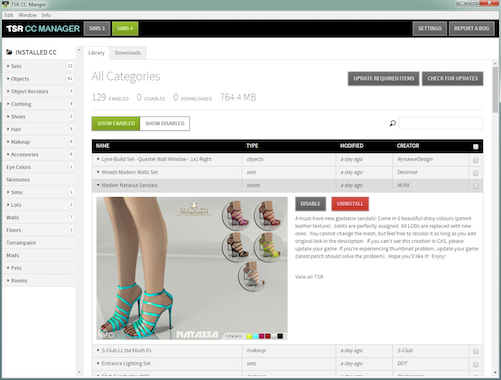
Basic Object Recolor for Sims 2
Download SimPE
After the download is complete, install SimPe. Read the warnings on using Simpe. It is possible to corrupt your game files if you change the wrong values. Remember to back up your files if you plan on exploring SimPE.
During the installation process you will also be given a list of software that you may want to download and install.
- Micrsoft .Net 1.1 is required for SimPE to work.
- For better compression results download and install Nvidia DDS Ultilities.
- Color Options Enabler Package is available at the SimPe homepage.
You will need Graphics software to recolor the exported graphics file. I use Photoshop, but Paint Shop Pro and other software also works just as well. With many graphics programs, there is a free trial. Or you could try free software if you do not already have another program to use.
Start SimPE

Wizards of SimPE
After the required software is downloaded and installed, start Wizards of SimPE. The shortcut is located in the SimPE folder under your list of programs in Windows. Click on Recolors, this allows you to recolor Maxis objects. It will take some time to move to the next screen.
Choose Object to Recolor

Select an Object
For this tutorial, we will choose an object that very few colors. In the future, when you decide to recolor objects with multiple colors, you will need to you use the magic wand or select tool to change parts of the objects. This time we will keep it simple possible. Click the 'Sofa by Club Distress' then, Click Next.
Select Fabric to Recolor

Select Fabric
Scroll down the possible fabrics to recolor and click the ivory one. Make sure Autoselect matching textures is checked. Click Next.
Export Files to Recolor

Export Sofa File
Select the displayed file, it should be the ivory sofa file. Click the Export Button. You will be prompted to save the file. Create a folder just for your recolors, in 'My Documents' or another place you feel comfortable with. Name the file 'sofa_distress' since that is the object's name in the game.
Open Favorite Graphics Program & Modify

Making the Selection
Since is the time you will need a graphic editing program. For this tutorial, I am using Photoshop. The tools we will be using can be found in other graphics software.
Start your favorite editing program and open the sofa distress file.
Zoom in wood that is top, center of the file. Using the Rectangle Marquee Tool (or another selection tool), select the brown wood.
After the selection is made, choose Select from the file menu - then Inverse (or Invert). The fabric of the sofa will now be selected and ready to be edited.
Changing the Object's Color

Adjust Hue and Saturation
Next, create an Adjustment layer by going to the Layer Menu - New Adjustment Layer - Hue/Saturation. A screen will appear with sliders for Hue, Saturation, and Lightness. Experiment with the sliders until you get the color you desire.
If you cannot create an adjustment layer, you can also check under Image for Adjustments and change the background layer directly. In some software, you may have to duplicate the original layer first. This can usually be done by right clicking the layer in the layer palette.
Merge layers before saving: Layer - Merge Visible.
Save your work. Make sure it is in png format. In Photoshop I used Save for the Web, and choose png under settings.
Import Recolored Object File
Import Recolored File
Go back to SimPe and click the Import button. Select the edited file and click Open. Once it is imported click Next.
Give Object a Name and Finish

Choose a Filename
Enter a filename for your newly recolored sofa. Give it a name that is something you will remember as yours. I named mine green_distress_sofa_courtney. This way I know the color and the base object.
Click Finish. The object will be saved and be appear in "The Sims 2."
Congratulations! You have recolored your first object for "The Sims 2."
How To Edit a Sim's Characteristics with SimPE
Note: SimPE can cause damage to your game if the wrong files are edited. Please backup your files before making changes. Backups can be done when you select your neighborhood within SimPe.
Here's How:
- Download SimPE
Download SimPE if you haven't yet done so. Make sure to download and install the required software to run SimPE - Microsoft .NET Framework and Direct X 9c. - Install and Start SimPE
Install SimPE and the required software. Once installation of SimPE is complete, start SimPE. You will find a link to SimPE on your desktop, programs list, or on the quick launch bar. - Open Neighborhood
With SimPE open, from the toolbar go to Tools - Neighborhood - Neighborhood Browser. This will open up the Neighborhood screen. Choose which neighborhood the Sim is in you would like to edit. After selecting the neighborhood, you can create a backup. Once the backup is complete, click Open. - Finding the Sim
In the top left part of the screen, there is a list of Resources under the Resource Tree. Scroll down to find and select the Sim Description icon. A list of Sims in the neighborhood will appear on the right. - Edit the Sim with SimPE
Scroll through the list of Sims and select the Sim you wish to edit. The Sim Description Editor will show a picture of your Sim and information about that Sim. This is where you will make your changes. You will see areas for career, relations, interests, character, skills, "University," "Nightlife," and other. - Make Changes & Save the Sim
After you have made the desired changes, click the commit button to save the Sim. You can now close the game and play "The Sims 2" to see your changes.
Tips:
- To edit the family tree, select Family Ties under the list of resources.
- Make backups of your neighborhood whenever you make changes. This will ensure you have a working copy just in case "The Sims 2" becomes corrupted after using SimPE.
What You Need:
- "The Sims 2"
- SimPE
- Microsoft .NET Framework Version 1.1
- Managed Direct X 9c
Rosesims items
News:
New pay hair and new gift:


There
are now three Taobao packages available. We should have most sets of
package 1 and 2 already. Package can be purchased for nearly 10$. Too
many pictures to post.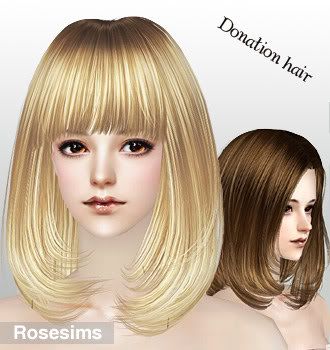
Gifts:
Gift 58 
Gift 72 (Also done by Portakal at GOS)
Gift 74 (Yuxi at GOS already made a f2m-conversion)
Gift 76 (Again already converted by Yuxi)
Gift 78
F2M-conversion of hair 94
Also done by Yuxi at GOS
Gift 79
F2M-conversion of hair 99
Gift 80
F2M-conversion of hair 103
Gift 82
Gift 84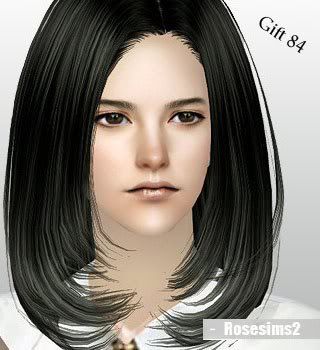
Gift 74, 78, 79, 80, 82, 84 and the Special Gifts can be bought separately now without the need of buying other files first.
A little Combination :P
Hair:Peggy http://www.simscave.com/index.php?topic=18143.0
Skintone:Subaxi MCV? http://lessims3desubaxi.blogspot.com/2010/08/male-non-default-replacement-skintone.html
Lips:?
Eyeliner:TSR http://www.thesimsresource.com/downloads/details/category/sims3-makeup-eyeliner/title/two-lashes--eyeliner/id/992907/
Dress:TSR http://www.thesimsresource.com/downloads/details/category/sims3-clothing-female/title/britney-spears-cosmo-dress/id/998410/


 Limited Time Offer
 For a limited time only, we’re giving away a free


